Creating a New Prescription
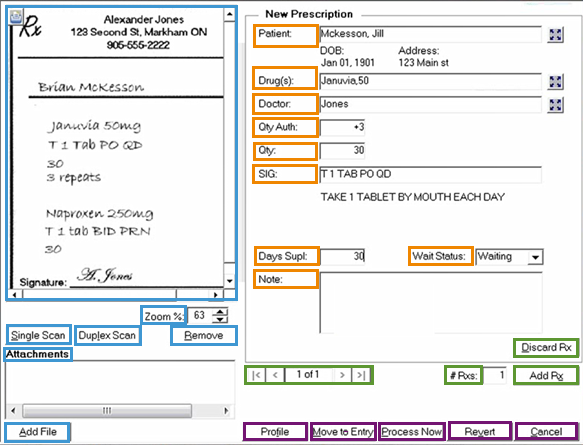
PharmaClik Rx enables you to create new prescriptions on the fly with the Prescription Intake feature available within the New Prescription window. The New Prescription window allows you to scan a prescription hard copy and uploads the scanned image within the window. Scanning the prescription allows you to easily view and copy over the information into the required fields (e.g. Patient, Drug, Doctor) and stores an electronic copy of the prescription in PharmaClik Rx. You can also reauthorize and refill prescriptions from the New Prescription window. To learn more, see Reauthorizing and Refilling from the New Prescription Window.
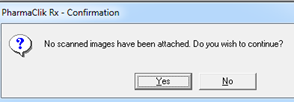
Note: If you want the prompt below (PharmaClik Rx - Confirmation) to appear when there is no scanned prescription image, you can configure this setting through Workflow Preferences. To configure this setting, see Workflow Preferences.
To learn more about each field, click a field box below or see New Prescription Window Overview.
To create a new prescription in PharmaClik Rx:
Watch the video or follow the instructions below:
- Navigate to Workbench > Prescriptions > New. The New Prescription window opens.
- Scan the written prescription by selecting one of these options:
- Single Scan— for one page prescription.
- Duplex Scan—for double-sided prescription.
- Select the patient. Patient's Birth Date and Address will display directly below the Patient field.
- Proceed to filling out these fields:
- Drug(s)—type the drug name or DIN.
- Doctor—Type the doctor's name in this format: Last Name, First Name.
- Qty Auth—Type the total amount authorized by the prescriber including repeats.
- Qty—Type the number of tablets, capsules, or units that you will dispense for this prescription.
- SIG—Type the prescriber's instructions for use or dispensing directions.
- From the Wait Status dropdown, select an appropriate Wait Status (e.g. 1 Hour).
- Optional: In the Notes field, specify any specific notes you may have for this prescription.
- For multiple prescriptions (duplex scan), ensure you have completed the necessary information for each prescription before proceeding to the next step.
- Optional: To add another prescription for the same patient, select Add Rx. Repeat steps 2–7. When finished, proceed to step 9. To create refills or reauths, see Reauthorizing and Refilling from the New Prescription Window.
- When finished select one of the following:
- Move to Entry/To Do—Select the Move to Entry or To Do button if you want to specify the prescription details later (one of these options will be available depending on your settings in Workflow Preferences).
- Process Now—Moves the prescription into Rx Detail for adjudication.
Note: Patient field is mandatory. Once selected, the Profile, Move to Entry/To Do and Process Now buttons will be enabled.
Note: Only one doctor is allowed for multiple prescriptions. All subsequent prescription pages will retain the same doctor specified in the first prescription and is not editable. If more than one doctor is required, create a new prescription entry (Workbench > Prescriptions > New).
Result: The Days Supl field will automatically populate based on the information supplied for Qty and SIG fields. If the Days Supl field does not populate, manually specify the number of days supplied that are valid for this prescription.
Note: The Patient and Doctor fields will already be populated and cannot be edited.
Table: New Prescription Window
| Field | Description |
| Patient | The patient's name must be specified as: Last Name, First Name. Clicking the expand icon  opens the Patient Search window where you can search and select a patient. opens the Patient Search window where you can search and select a patient.The Patient field is mandatory and once selected, the Profile, Move to Entry and Process Now buttons will be enabled. |
| Drug(s) | Specify the drug name or DIN. To add more than one drug, use a forward slash "/" to separate the DINs or drug names (e.g. 80017405/2251574). When the Drug(s) field is blank, clicking the expand icon When the Drug(s) field contains the drug name(s) or DIN(s), clicking the expand icon |
| Doctor | The doctor's name must be specified as: Last Name, First Name. Only one doctor is allowed for multiple prescriptions. All subsequent prescription pages will retain the same doctor specified in the first prescription and is not editable. If more than one doctor is required, create a new prescription entry (Workbench > Prescriptions > New). When the Doctor field is blank, clicking the expand icon When the Doctor field contains the doctor's name, clicking the expand icon |
| Qty Auth | The amount the doctor has authorized. |
| Qty | The amount you are dispensing for this prescription. |
| SIG | Specify the dispensing directions for the drug. |
| Days Supl | Automatically populates based on the information supplied for Qty and SIG fields. If the Days Supl field does not populate, manually specify the number of days supplied that is valid for this prescription. |
| Wait Status | You can assign one of the following wait statuses to the prescription to help your pharmacy prioritize which prescriptions should be completed first based on when the patient will return to pick up the prescription(s):
For more information on wait statuses, see Prioritizing Prescriptions Using Wait Statuses. |
| Note | You can add comments in the Note field (e.g. additional information about the patient). The Notes field will be attached as a prescription note to the prescription(s) being filled. |
| Pages | View and edit prescription pages by using the left and right navigation arrows. |
| #Rxs | Displays the number of prescriptions on the scanned prescription. |
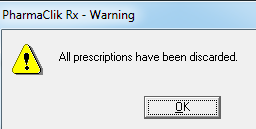
| Discard Rx | Selecting Discard Rx removes a prescription page. If you remove all prescription pages, you will see the following prompt (PharmaClik Rx - Warning):
|
| Add Rx | Selecting Add Rx adds a new prescription page. |
| Profile | If the Patient field is blank, selecting the Profile button opens the Patient Search window to search and select a patient. If the Patient field contains the patient name, selecting the Profile button opens the patient's profile. |
| Move to Entry/To Do | If Move to Entry is turned on in Workflow Preferences and you want to enter the prescription details later (e.g. Drug(s), Doctor, Qty Auth) , select Move to Entry to move the prescription into the Waiting for Data Entry queue in the Workflow tab. To turn on Move to Entry setting, see Workflow Preferences. If Move to Entry is turned off in Workflow Preferences, this button will appear as To Do. Selecting To Do will move the prescription directly into the To Do tab (Workbench > Prescriptions > To Do). |
| Process Now | Selecting Process Now opens the prescription in Rx Detail. If Workflow is enabled, the prescription will move to the next workflow status of Pending. To turn on Workflow, see Workflow Preferences. |
| Revert | Selecting the Revert button clears any information that has been specified in any of the fields within the New Prescription window. |
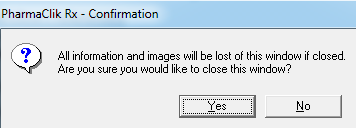
| Cancel | Selecting Cancel will cause you to lose any information or images within the New Prescription window. You will see the following prompt to confirm you want to cancel:
|
| Preview Window | A preview of the scanned prescription will display. Select the Print icon  to print the scanned prescription image. You can also print attachments by highlighting the attachment, and selecting the Print icon . to print the scanned prescription image. You can also print attachments by highlighting the attachment, and selecting the Print icon . |
| Zoom % | Use the up and down arrows to adjust the Zoom % to enlarge (or reduce) the scanned prescription image in the Preview window. You can also specify a specific percentage in the Zoom % field (e.g. 50%). |
| Single Scan | Using the Single Scan button, you can scan one or more pages of written prescriptions (one-sided). |
| Duplex Scan | Using the Duplex Scan button, you can scan double-sided pages of written prescriptions. |
| Add File | Documents can be attached (e.g. faxed prescriptions) to the prescription by selecting the Add button. |
| Attachments | The Attachments section displays any documents you have attached. |
| Remove | Using the Remove button, you can remove scanned images. You can also remove attachments by highlighting the attachment and selecting Remove. |